Saturday, February 25, 2012

SC Sketch Round-Up

I'm embarrassingly behind in showing you what we've been up to at Scrapbook Challenges!  Since moving to our new .com platform around the first of the year, there have been a number of exciting changes including a new, fresh look for the sketches and a double-page version for each one.  It's been really cool to see how the Design Team interprets the week, and I'm always thrilled to see the site members play along!

So, here's a little round-up of the goodies over at SC and my sample work of them...as always, you can click to see a larger, higher res version.  Sketch numbers are linked to the threads at SC.


H2O Skiing digital scrapbooking layout by Chanell Rigterink Credits Digital Papers: Breezy by Kara Dudley; Brush, Stitches: Digi Essentials by Kara Dudley; Sketch: 278 by Scrapbook Challenges; Fonts: JPaige SpongeJob, Century Gothic


BUNN Bliss digital scrapbooking layout by Chanell Rigterink Credits Digital Kit: The Sun Will Come Out by Sugarplum Paperie; Journal Cards, Word Art: Every Day of the Year Note Cards by Sugarplum Paperie; Paint: Splatterific 11 by Karah Fredricks; Border: Outer Limits 4 by Karah Fredricks; Alpha: Old Typewriter Alpha by Gunhild Storeide; Sketch: 279 by Scrapbook Challenges; Fonts: Rock It, Underwood Champion

 Sketch 280(A) (I replaced center strip of elements with small pictures...)

Cooking with Pinterest digital scrapbooking layout by Chanell Rigterink Credits Digital Paper: Rise and Shine Papers by Raspberry Road Designs; Silverware: Domestic Goddess Add-On by Raspberry Road Designs; Vegetable Stamps, Baker's Twine: Gunhild Storeide; Sketch: 280 by Scrapbook Challenges; Fonts: Grants Ghosts, Underwood Champion; Other: photos and logo from Pinterest.com


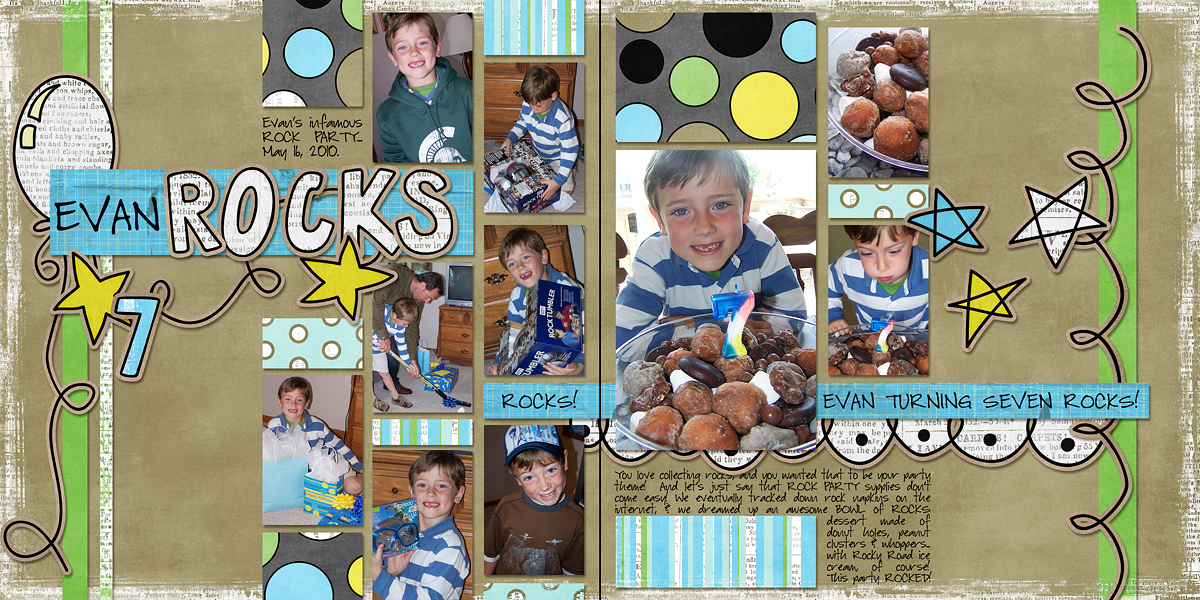
 Evan ROCKS digital scrapbooking layout by Chanell Rigterink Credits Digital Kit: Birthday Boy by Faith True; Sketch: 281 by Scrapbook Challenges; Font: Baby Boston


Toothfairy Time digital scrapbooking layout by Chanell Rigterink Credits Digital Kits: Sweet Storytelling and My Happiness Add-On by Sahlin Studio; Journal Cards: Hello Love Journaling Cards by Robyn Meierotto; Sketch: 282 by Scrapbook Challenges; Fonts: Freeze, Underwood Champion

Sketch 283 Double (I used the left half only...)

 SK8R BOI digital scrapbooking layout by Chanell Rigterink Credits Digital Papers: Dude. Totally by Tia Bennett; Digital Elements: Starcastic by Connie Prince; Border: Outer Limits 4 by Karah Fredricks; Sketch: 283 by Scrapbook Challenges; Fonts: XXII Dirty-Army, Century Gothic

Monday, February 13, 2012

Pinterest-Inspired Sketch Freebie 4

Happy Monday!  I'm feeling sketchy ;).  How 'bout #4 in the Pinterest-inspired series?

The Inspiration (pinned here):


I turned this into a sketch within an hour of pinning it.  I love the frame over only part of the main subject, the flowing lines, small embellishments, and tiny supporting image in the lower right corner.  I'm drawn to the vintage quality of it, but the sketch itself has so many wonderful opportunities for modern interpretations, too!

The Sketch:


Enjoy!

Thursday, February 9, 2012

Our 2012 Valentines

I'm gonna blame the pregnancy for this craft-kick I've been on.  It's prolly the best explanation for why I've lost my mind.  Because I really have.  Why else would I have suggested to the kids that we *make* their valentines this year?!


In all honesty, though, these were pretty fun and easy.  No hot glue was involved, I got to take some pictures, and most of my parts of the projects were done on the computer.  Each kiddo picked their own valentine to make, and I really love how each reflects their personalities: rocker for the eldest, something perfect for maze-crazed #2, butterflies for the girl, and *that smirk* from pup.  I just grin at all four of them!

I found the ideas for these on Pinterest (gasp!).  It was neat to let the kids flip through the pins and make their decisions.  Credit where credit is due, though:
We came up with the Rocker theme on our own, but it was obviously inspired here. 
Make sure you download the template.  I thought I'd do my own, and hers is sooo much easier. 

The other neat thing about this approach was how we could use more "boy-friendly" colors.  Trust me when I say they were each very involved in picking out the supplies for their projects.  I know these look like mommy took over, but I *promise* you...my sons are quite used to scrapper-me asking them to make design and color decisions, and they've developed strong tastes and styles of their own.  Loooove these kids!

And I *did* make them work on the projects, too.  I cut the hand-holes in the photos and cut out the butterflies, but they did any sticker-ing, sucker-ing and adhering themselves.  Except the youngest.  His contribution was to sit still long enough for the photo, which was actually a tremendous feat!

I saw someone's comment on Pinterest that these look expensive to make.  I got the suckers, glittery heart stickers, and plastic mazes all at the dollar store...something in the $10 range.  I printed the butterflies onto cardstock that I already had, and the other cards are 4x6 photos that I printed at Costco for $.13 each.  So, that was another $6 or $7.  Round it up to $20 total for four kids?  Do-able.

Admittedly, that's more than I usually spend on valentines.  But, look, I'm *really cheap* thrifty, and we typically buy a box of premade ones (dollar store if possible, or $3 each at Meijer) and don't do candy.  The kids were thrilled that I was buying candy, and we had sooo much more fun designing these together than our usual roles (me harping on their handwriting while they sign the store versions.  Side note: they adored that I scanned their signatures onto these cards!).  For that, I'll gladly pay the couple extra bucks!

Maybe I'll even do it again next year!  Oh, who's kidding?  I'm pinning 2013 ideas already...

Tuesday, February 7, 2012

Decorating for Valentine's Day

I don't usually decorate for holidays other than Halloween and Christmas.  But our new house has this fantastic little landing as you come up the half-flight of stairs from the front entrance into the living room, and it seemed like the perfect spot to put just a couple seasonal things.  And then there's this Pinterest thing where I get too many ideas and have to try them out... Long story short: this year, we have Valentine decorations!


It all started with the Heart Felt Garland, inspired by this pin.  This was soooo easy (even a caveman could do it).  I chose four shades of felt (maroon, bright pink, light pink and white) and bought two 9x12 sheets of each.  Cost: like $2.50.  I cut the sheets into strips, then cut them into 2-inch hearts using a little pattern I did on the computer and printed on cardstock.  Then I just ran them through the sewing machine, one right after another.  It turned out that *one* sheet of each color made a garland long enough for my banister, so I also have these hearts strung all over my mantel, and a few over the dining room chandelier. The kids love it.  It's certainly a project that will show up again in different shapes and colors for parties!


At that point, I was feeling very crafty, so I decided to make these Conversation Hearts as a riff on this pin.  I didn't use the free printable offered on that blog, because I wanted to match the colors to my garland and fit them in this dollar store frame.  I did copy her sentiments and mimicked the shadows to give the hearts a bit of a 3-D effect.  Printed out on white cardstock, this project took about 15 minutes and cost a buck!

Then I was totally on a roll.  Next: the Cupcake Liner Pom Poms, inspired by this pin.  Here's where my quick progress ground to a halt.  It's not that I don't get along with my glue gun...but these things took for-evah.  And I remember cupcake liners being cheaper.  Even with my dollar store stryofoam balls as a base, I probably spent upwards of $5 on this project...more than I had expected.

The pink one is made with regular-sized liners using the pin-and-glue method described in the blog. A word to the wise: use pins with ball-heads on them.  I tried the flat ones that I had on hand, and it was awful.  They pulled through the liner, exposing my fingers to the hot glue, and were just generally awkward to use.  The little white pom I made with mini-liners, and I junked the pins altogether.  I wrapped the liner around the tip of the pencil and just pressed it into the stryofoam, holding a couple seconds so it could set.  It was insanely easier, faster, and my fingers were much better protected.  Ultimately, I'm not sure I'd try this project again...but they look cute for now.  My six-year-old daughter adores them.


About halfway through the glue-gun fiasco, I needed a break to buy more pink liners and let my fingerprints grow back in, so I went surfing and found the Valentine Subway Printable, pinned here.  This was really cute, downloaded in a nice high quality file and printed perfectly.  My Costco 5x7 print was $1.50 and I hit up the dollar store again for the gold frame.  Cheap.  Easy.  Done.

My kids have enjoyed this little foray into crafting...probably more than me.  There is a reason, after all, that I became a *digital* scrapbooker...I hate the fuss and muss of glue and scissors and scraps.  But all in all, the projects came out well and I'm totally glad I decided to go for it!